Integrate with GoMeddo
If you are a GoMeddo user and want to integrate with GoMeddo Floorplan follow the following steps. This allows you to automatically create Area Occupancies based on the Reservations in GoMeddo. With this functionality you are able to see, in real-time, how updates in your resource-calendars are reflected in the floorplan.
Install the Bridge
Please be aware that there is a dependency of version v4.74 of GoMeddo and V2.3 of GoMeddo Floorplan.
Important! Make sure to always install “For Admins Only”.
Assign Permission Set
After that you have to perform some configuration to give users access to the right fields. This can be done directly by assigning the Booker25 to GoMeddo Floorplan User permission set, on top of the GoMeddo Floorplan Admin or GoMeddo Floorplan User permission sets. This will give access to the following fields:
Read/edit for the field
Reservation__conFP25__Area_Occupancy__cRead for the field
Area__conB25__Reservation__cRead/edit for the field
Area__conB25__Resource__c
Create Mappings
Go to Setup
Go to Custom Metadata Types
Click Manage Records next to Floorplan Status Mapping
Click New
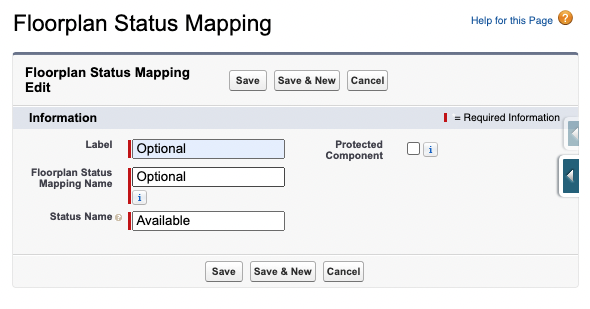
Create a mapping by following the table below:
Label | Label of the mapping |
Floorplan Status Mapping Name | The GoMeddo Status name |
Status Name | The Floorplan Status name |
For example:

Map Resource to Area
Go to the Resource that you want to sync. There is a field on the GoMeddo Resource object named Area__c which you can fill with the Area that needs to be kept in sync.
What’s next?
Now you can create a floorplan, create an area on that floorplan and go to the GoMeddo resource that you want to keep in sync with the area. There is a field on the GoMeddo Resource object named Area__c which you can fill with the Area you just created.
Now, when you create a reservation an Area Occupancy is created/updated to reflect the status and time of the reservation.
