This article explains what the Default Blueprint Time Slot Picker flow template looks like in action (for users), and how it can be customized by admins.
Overview
This template lets a user pick a resource and a blueprint. Next, the user can choose a time slot that allows one or more reservations to be made, based on the selected resource and blueprint. Finally, the reservations will be created.
More information about blueprints: Reservation Blueprints for Parent Child
More information about parent/child reservations: Parent & Child Reservations
The flow in action (for users)
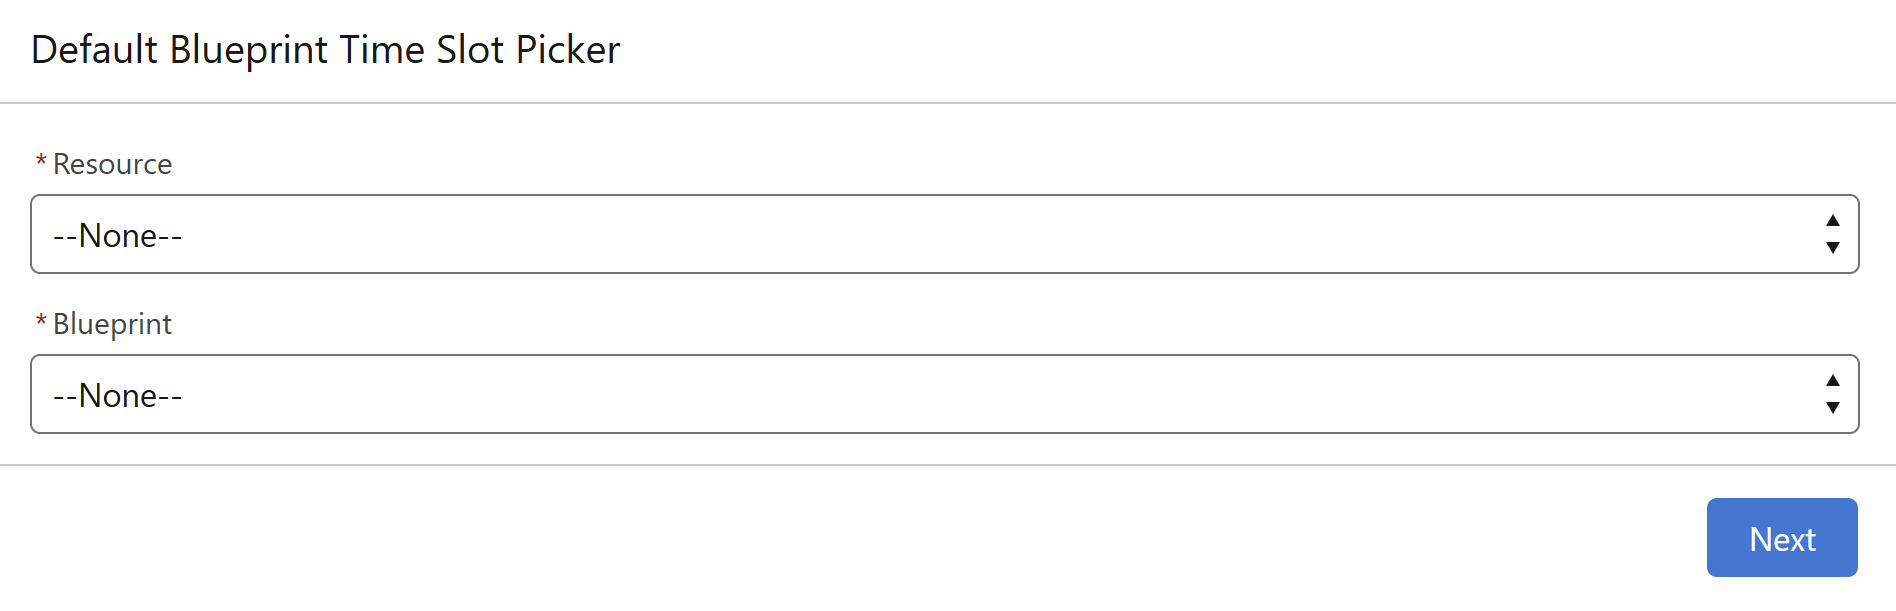
Step 1: Pick a resource and a blueprint
First the flow will ask the user to pick a resource and a blueprint. By default this shows all the resources of type Building in the org, and all the (non-child) blueprints.
Step 2: Pick a time slot
Next, the flow will calculate all the time slots for which at least one of the blueprint combinations is possible. The user can click the arrows on each side to navigate through the time range. The user picks a slot by clicking on it, and then clicking Next.
Step 3: Create reservations
After the user has picked a slot and clicked Next, the default flow template will simply insert one of the combinations that are possible during that slot, and then the flow will end.
This step can be customized to potentially allow a user to further choose one of the possible collections (if there are multiple available during the selected slot), or to show more information to a user after the reservation(s) have been inserted.
The flow in the builder (for admins)
In the builder, the flow looks like this:
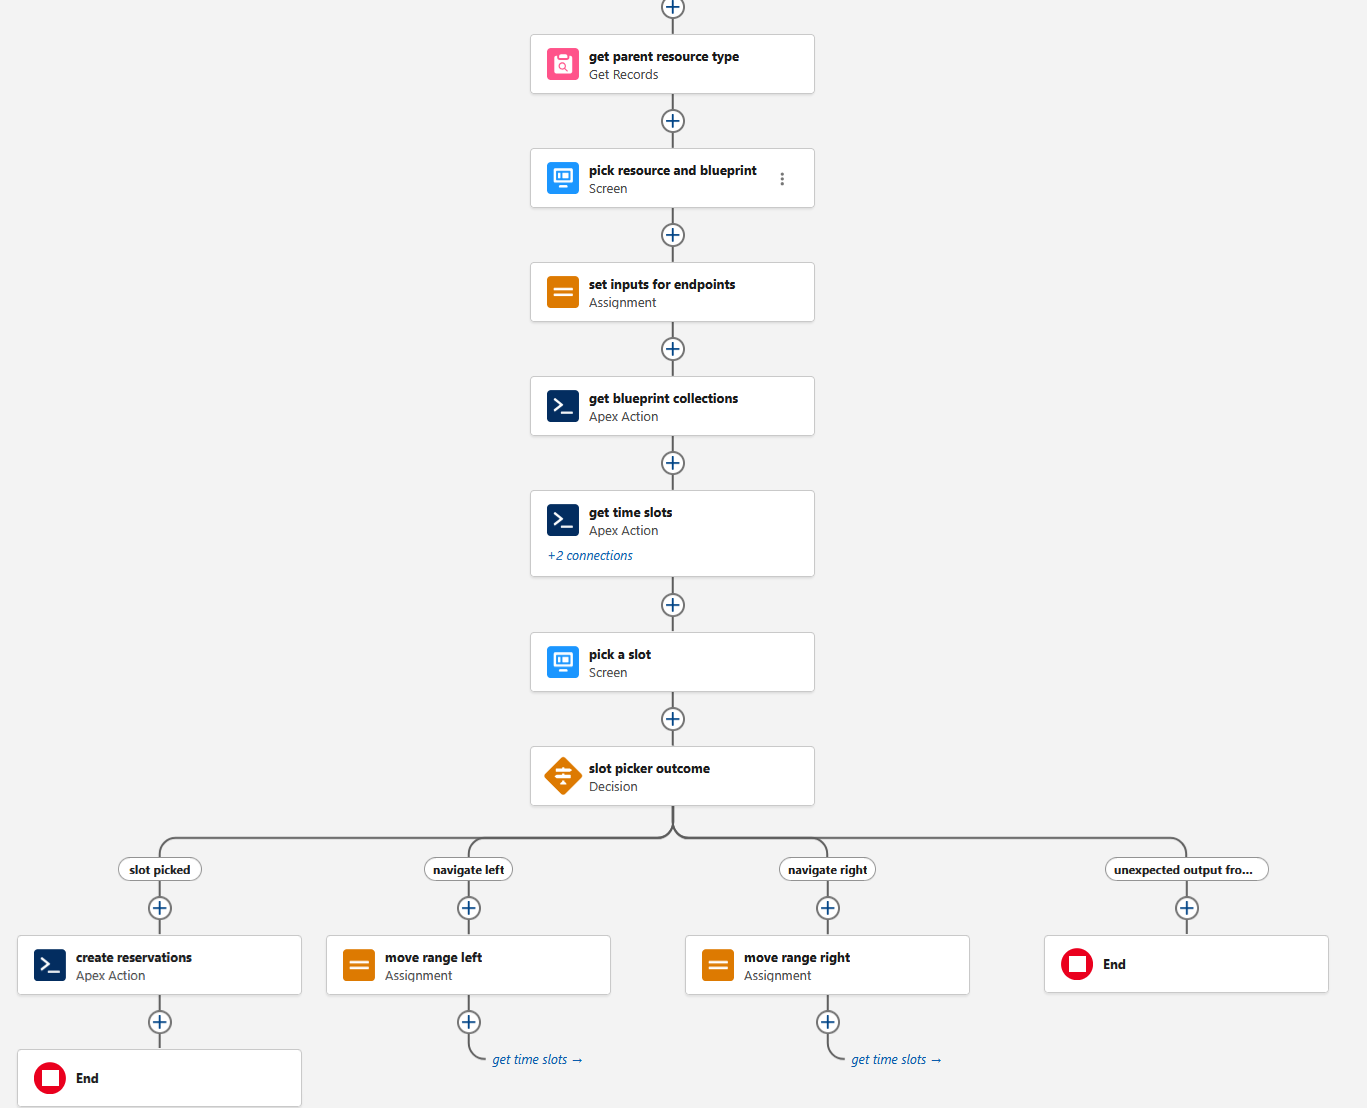
Get parent resource type (Get Records)
First, the flow will do a Get Records to fetch the parent resource type, used to populate the resource choice in the first screen of the flow. By default, this queries the Building type, but you can change this to another resource type. If your blueprints produce parent/child reservations, make sure this is a parent resource, with child resources below it to hold the child reservations.
Pick resource and blueprint (Screen)
This presents the first screen to the user where they can pick a resource and a blueprint. You can change the labels of the picklists, or remove one or both of the picklists (and this screen) if these are pre-populated by your flow and not user-selectable. By default this shows all the resources of type Building in the org, and all the (non-child) blueprints.
Set inputs for endpoints (Assignment)
Here, the inputs for the next two apex actions are set. By default, the slot duration is set to the duration of the selected blueprint. The date range for fetching time slots defaults to 14 days, starting today. If you want the range to start at another date, you can add another assignment in this step to set timeSlotConfig > dateRange > startDate.
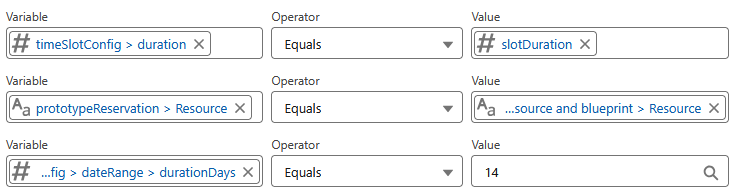
An important part of this step is setting the resource of the prototype reservation. This defaults to the resource selected by the user in the first screen. This resource is used to get all the possibilities for blueprint fields that define ‘Child of parent resource’ or ‘Available at parent resource’ as the population method.
Get blueprint collections (Apex Action)
Before fetching the actual time slots, the flow first calls the ReservationBlueprints endpoint to get all the possible combinations for the selected blueprint and prototype reservation. These are returned as a list of ReservationCollection, which are then passed on to the next Apex action.
Get time slots (Apex Action)
This call gets the actual time slots, based on the collections from the previous step, and the timeSlotConfig.
Beware that the time fields of reservations returned by this action have not yet been populated, and the time information is stored on the slots instead. The next step with the visual time slot picker component will populate these fields on the reservations once a slot has been selected.
Pick a slot (Screen)
This screen uses the output of the previous step to show a time slot picker to the user. The user can navigate through the currently populated time slots using the previous and next arrows. If they click a navigation arrow while at the end of the populated range, the component will trigger the flow’s Next event, causing it to loop back to the fetch the next range of slots and display the picker again (handled by the Slot picker outcome decision element).
When the user selects a slot and clicks Next, the component populates the output variable selectedTimeSlotWithReservationCollections with the selected slot. This slot contains all the blueprint combinations that are possible at that time, with their time fields (Start__c and End__c) set based on the slot time. For child reservations, this takes into consideration their order and duration.
The time zone of the displayed slots defaults to the user’s browser time zone, but can be overridden on the time slot picker component.
Slot picker outcome (Decision)
This element detects whether the user has made a selection, or whether they navigated beyond the populated range. In case of the latter, it will route to the navigate left or navigate right step, which will update the timeSlotConfig > dateRange and loop back to the get time slots step to fetch the next range of slots, and display the picker again.
Create reservations (Apex Action)
Finally, this action takes a ReservationCollection and inserts it. This is where the default flow template ends, but you could add more steps, for example to show more information to the user after the reservations have been inserted.