Install SFDMU
Start with downloading and installing the SFDMU plugin:
https://github.com/forcedotcom/SFDX-Data-Move-Utility
Download JSON
These steps assume you already performed the steps in Deploy Configuration records
The following data will be migrated between the target-org and the source-org when using the export.json here on the right. You first need to unzip the data.zip file which give you a folder to perform the actions.
-
B25__Resource_Type__c
-
B25__Resource__c
-
B25__Staff__c
-
B25__Availability__c
Perform the following steps to migrate this data between orgs
-
Install the Salesforce CLI by following the steps mentioned here: https://developer.salesforce.com/docs/atlas.en-us.sfdx_setup.meta/sfdx_setup/sfdx_setup_intro.htm
-
Authorise the source-org (so the org where the data is currently is with the help of the the
sf org login webcommand) https://developer.salesforce.com/docs/atlas.en-us.sfdx_cli_reference.meta/sfdx_cli_reference/cli_reference_org_commands_unified.htm#cli_reference_org_login_web_unified -
Authorise the target-org (so the org where the data should be going)
-
Install the SFDMU plugin by running
sf plugins install sfdmuin a terminal -
Make sure to create two Custom Settings to disable two Triggers on Resource and Resource Type as described here
Disable ResourceandDisable ResourceType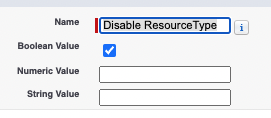
-
Download and navigate to the export.json
-
Navigate your Terminal to the folder where the export.json is stored
-
Run the following command, replace the usernames of the target and the source with the usernames you used to authorise the orgs in step 2 and 3.
sf sfdmu run --sourceusername <SOURCE_USERNAME> --targetusername <TARGET_USERNAME> -
Remove the two custom settings that you have just created when the deploy has been completed.