Reservation Statuses are used to define the status of a reservation, for example Optional or Definite. Reservations can be displayed in different colors on the calendar, depending on their status.
Create a new Reservation Status
-
Go to the Reservation Status tab in the GoMeddo app
-
Click New to create a new Reservation Status
-
Define a Name for the status
-
Define if the status should be the Default for new reservations
-
Make sure it is Active in order to make it visible to your users
In versions up to 5.4 a “Final status” setting was available which only was supported on the old Visualforce calendars. Later version don’t support this anymore.
Define colors for each Reservation Status
You can customize the appearance of a reservation on the calendar based on its status. You can do this by creating Reservation Colors.
It is good practice to make sure colors exist for all the Reservation Status / Reservation Type combinations in your org. If you have a Reservation with an unexpected color, double check what its Type and Status are, and what color you have configured for that combination. Also make sure the Reservation Type is linked to the Calendar, as described here: Reservation Types
You can customize the appearance of reservations on a calendar using Reservation Colors. These let you define the background color, the text color, and an optional border color.
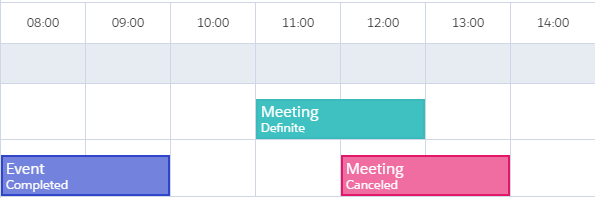
You can define different colors based on a reservation’s status or its type. The next section will show you how to configure colors records.
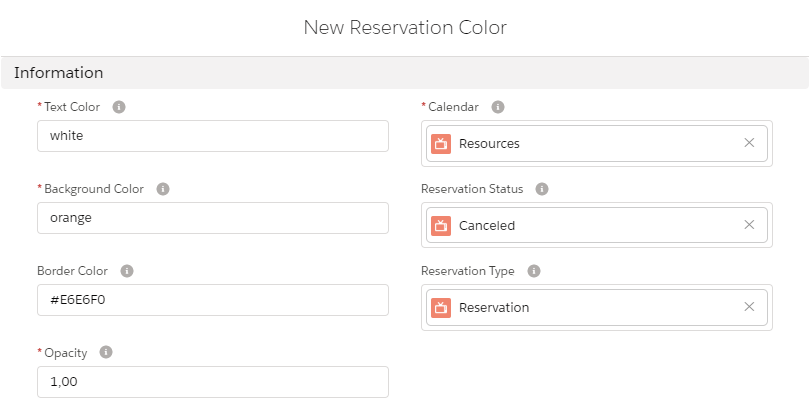
Create a Reservation Color
-
Go to the Calendars tab in the GoMeddo app and find the Calendar record that you want to add/modify the colors for.
You might need to switch your view from 'Recently Viewed' to 'All' if you do not see the record you want to edit.
-
On the Related subtab, scroll down to the Reservation Colors related list, and click New.

-
Fill in the colors as desired. You can use color names or HEX values to fine-tune the exact colors.
-
Select the Reservation Status that this color applies to.
For more info:Reservation Statuses -
Select the Reservation Type that this color applies to (GoMeddo includes a default reservation type named 'Reservation' when freshly installed).
For more info: Reservation Types -
You can set the Opacity to a value lower than 1 to make the color slightly see-through.
It is good practice to make sure colors exist for all the Reservation Status / Reservation Type combinations in your org. If you have a Reservation with an unexpected color, double check what its Type and Status are, and what color you have configured for that combination.
Also make sure the Reservation Type is linked to the Calendar, as described here: Reservation Types
Linking Reservation Types to Statuses
You can define which Statuses are valid for each Reservation Type. Whenever you create a new Reservation Type, each existing Status is automatically linked to it. Likewise, whenever you create a new Status, it is automatically linked to each existing Reservation Type. You can control which Statuses are valid for which Types by removing these links:
-
Go to the Reservation Types tab
-
Click on the Reservation Type you want to edit the Statuses for
-
Go to the Related tab, and find the Statuses related list (add it to the page layout if it's not visible)
-
Remove any Statuses from this list.
-
Optional: set the Order field to control the ordering in which Statuses are shown in the Status picklist.
Related articles