What is a Reservation Type
A reservation type allows you to separate reservations into categories. Different Reservation Types can show different fields and related lists on the Reservation Form. Reservation types can be used automatically assign a Record Type to the reservation. It’s also possible to use duration on a reservation type, allowing you to give a fixed duration to a specific type of reservation. You can also assign different colors to be displayed on the calendar based on Reservation Type.
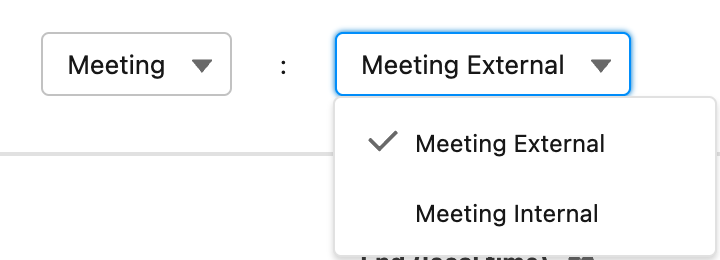
Reservation types can have a super-type which allows you to first select the super type before selecting the reservation type. For example If you have three reservations types, ‘Events’, ‘Meeting External’ and ‘Meeting Internal’ you can both group the last two under a super type ‘Meeting’ to distinguish this type in the first picklist.
Creating a Reservation Type
-
Go to the Reservation Types tab
-
Click New
-
Specify the Name of the Reservation Type you want to create. This name will be displayed on the Reservation Form
-
Optional: If you want this type of Reservation to have different fields on the Reservation form than other types, specify the API name of a Field Set on the Reservation object
-
Optional: Set the Record Type you want reservations of this Reservation Type to have
-
Optional: Set a Super Type this reservation type belongs to
-
Optional: Set a Duration this reservation should enforce on the reservation form, if you do this users will not be able to deviate from this duration. (if you want to override this for specific users, you can assign the Custom Permission, “Override Reservation Duration”, those users can make reservation without the duration rules being enforced.
Out of the box, GoMeddo includes one Reservation Type named 'Reservation'. Feel free to edit the name, or to remove it once you have created other Reservation Types. Make sure you always have at least one Reservation Type.
Linking Reservation Types to Calendars
Each Reservation Type is only visible on calendars that they are linked to, unless the Show Unlinked Reservation Types setting is enabled on the Calendar record.
By default, whenever you create a new Reservation Type, it gets linked to every existing Calendar record. Vice versa, whenever you create a new Calendar, every existing Reservation Type gets linked to it. If this behavior is not desired, you can disable the Reservation Type and/or Calendar trigger(s) as described here: Disable GoMeddo Triggers.
If Show Unlinked Reservation Types is TRUE, and a user click on a Reservation of a Type that is not linked to the calendar, the Type will be temporarily added to the list of available types.
-
Go to the Reservation Types tab
-
Click on the Reservation Type you want to link to calendars
-
Click New Calendar Reservation Type on the Calendar Reservation Types related list
-
Specify the calendar you want to link this reservation type to
-
Optional: set this reservation type as the default reservation type on this calendar.
-
Optional: set the Order field to control the ordering in which Reservation Types are shown to the user when editing a Reservation.
Linking Reservation Types to Statuses
You can define which Statuses are valid for each Reservation Type. Whenever you create a new Reservation Type, each existing Status is automatically linked to it. Likewise, whenever you create a new Status, it is automatically linked to each existing Reservation Type. You can control which Statuses are valid for which Types by removing these links:
-
Go to the Reservation Types tab
-
Click on the Reservation Type you want to edit the Statuses for
-
Go to the Related tab, and find the Statuses related list (add it to the page layout if it's not visible)
-
Remove any Statuses from this list.
-
Optional: set the Order field to control the ordering in which Statuses are shown in the Status picklist.
The Status picklist on the Reservation form is intelligent, in the sense that it will only show active Statuses that are valid for the selected Reservation Type.
Define colors for each Reservation Type
You can customize the appearance of a reservation on the calendar based on its type. You can do this by creating Reservation Colors, as explained in the following article: Reservation Colors
It is good practice to make sure colors exist for all the Reservation Status / Reservation Type combinations in your org. If you have a Reservation with an unexpected color, double check what its Type and Status are, and what color you have configured for that combination.
Super Types
If your organisation has a large number of Reservation Types, it might be useful to divide these into categories so users can more easily find the type they are looking for. When you use Super Types, the dropdown that would normally contain Reservation Types now contains Super Types, and a new field will be added to the form with the Reservation Types of that Super Type.
If you start using Super Types, any Reservation Types that are not assigned a Super Type will not be visible on the Reservation Form.
Create a Super Type
-
Go to the Object Manager in Salesforce Setup
-
Go to Reservation Type
-
Go to Fields & Relationships
-
Click on the Super Type field (don't click edit)
-
Scroll down to the Values related list
-
Click New
-
Add the names of the Super Types you want to add
-
Click Save
-
Go to the Reservation Types tab
-
Assign a Super Type to all the Reservation Types you want to use
The Super Type options shown to the user on the Reservation Form follow the ordering of the picklist values of the Super Type field.
Related articles