Prerequisites
To create Teams meetings, a Microsoft Azure account is required. Note that the API is only designed to be accessed by an Azure developer account, a work account, or a school account. Personal accounts do not have access to the ability to create Teams online meetings.
Integration setup with a work account
To use the integration with a business account, you must have Microsoft 365, and access to Microsoft Entra ID (formerly Azure Active Directory). The user that is configuring Microsoft Azure must also have logged into Teams previously in order to create meetings.
Set up GoMeddo Application in Azure
The first thing needed is to set up a new custom application in Microsoft Entra ID that will be used to generate the authentication and authorization info for GoMeddo connections.
The process for setting up the application will involve:
-
Creating an application record
-
Configuring API permissions
-
Generating a client secret to be used in Salesforce
-
Specifying a redirect URI in Azure for GoMeddo (completed after creating the record in Salesforce)
App Setup
-
Navigate to the Microsoft Entra ID home page
-
Create a new App from the App Registrations link along the left hand side and click on New Registration
-
Provide a name for the app (e.g. GoMeddo) and leave the supported account type on single tenant
-
We will fill in the redirect URI in a later step
-
-
Click Register
API Permissions Setup
-
Click on API permissions from the left-hand side of the application you have created.
-
Click + Add a permission
-
Select Microsoft Graph
-
Select the following Delegated permissions (you can select them in one go):
-
Mail.Read -
Offline_access -
OnlineMeetings.ReadWrite -
User.Read
-
-
Click Add permissions
-
-
Click + Add a permission
-
Select Microsoft Graph
-
Select the following Application permission:
-
OnlineMeetings.ReadWrite.All
-
-
Click Add permissions
-
-
Click on Grant Admin Context for MSFT.
-
Click Yes
-
Your page should now look like this:
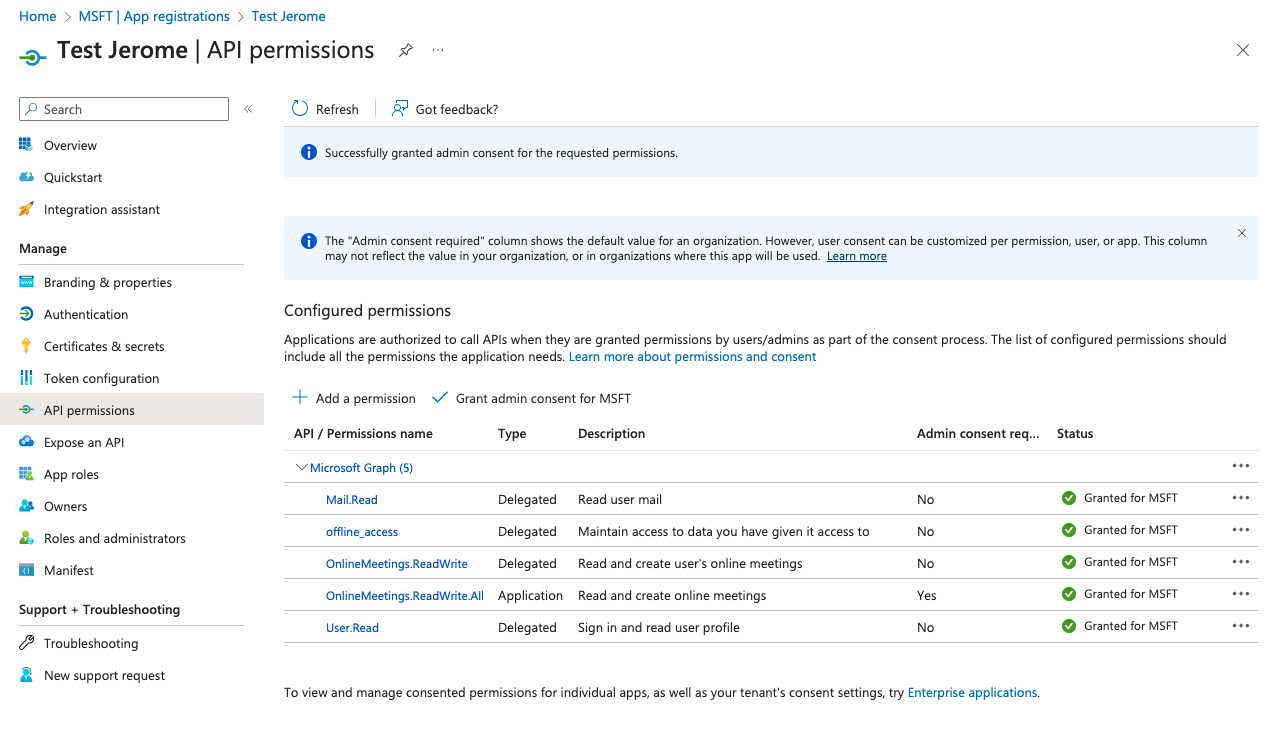
API permissions - Please see Set up Teams meeting policies as well
Certificate Setup
Next we will create the client key and secret (to be used in Salesforce).
-
Click on the Certificates & secrets Menu item on the left hand side.
-
Click on New client secret
-
Enter a new description and the expiration of the secret. You can choose whatever you like or keep the default.
-
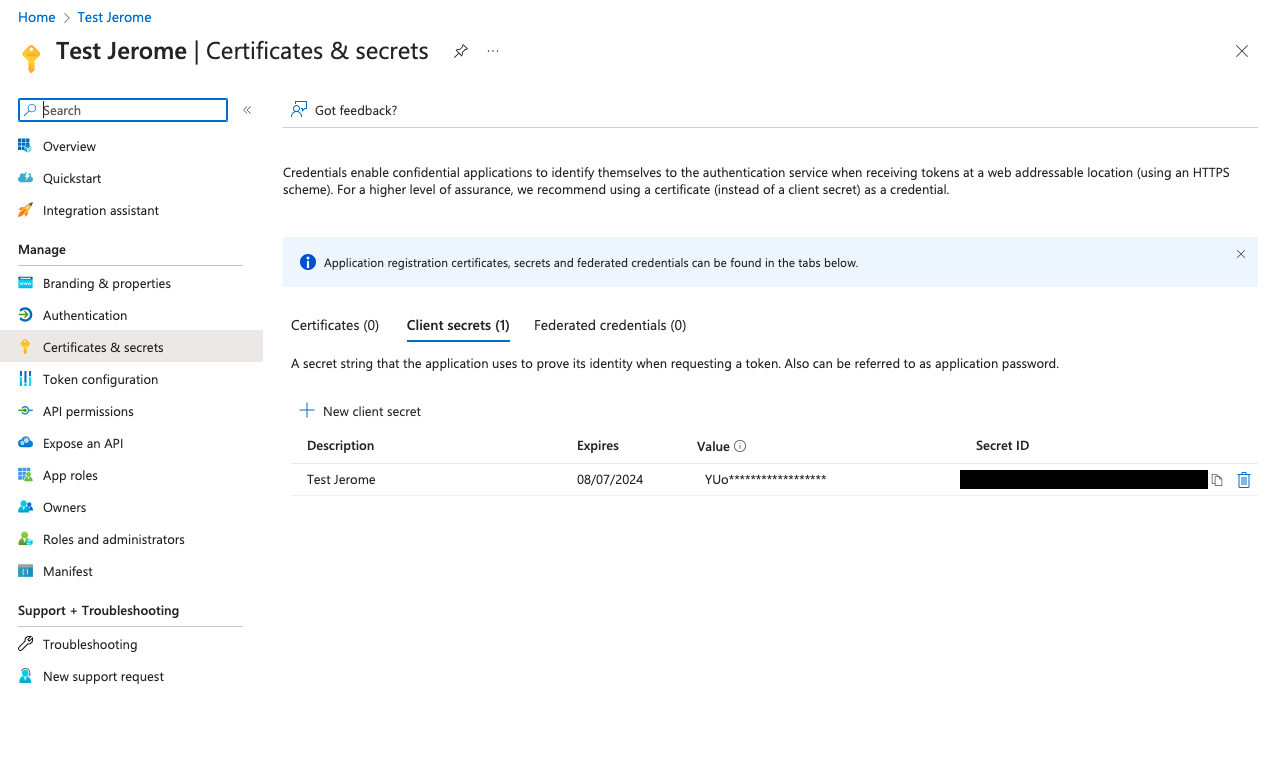
Click Add
Important: Copy and save the Value for later use when setting up authentication in Salesforce. You will not be able to access it again if you navigate away from the page (you will have to create a new one)
Setup Salesforce
Setup Auth. Provider in Salesforce
To set up an Auth. Provider in Salesforce, follow these steps:
-
Open Salesforce in a new screen
-
Go to Setup > Auth. Providers
-
Add a new provider and choose "Open ID Connect" as the type
-
Fill in a Name and press Tab, this will also fill in the URL Suffix
-
Go back to your Azure screen > Microsoft Entra ID > App Registrations > All applications > “Your New App” and copy the Application (client) ID
-
Go back to your Salesforce screen and paste the value in the Consumer Key field
-
Fill the Consumer Secret field with the value that you copied earlier when creating the Certificates & Secrets in Azure
-
Navigate back to Microsoft Azure > Microsoft Entra ID > “Your App Name”
-
Click Endpoints. Copy down the following two URLs:
-
OAuth 2.0 authorization endpoint (v2)
-
OAuth 2.0 token endpoint (v2)
-
-
Fill the Authorize Endpoint URL with the OAuth 2.0 authorization endpoint (v2) value you just copied
-
Fill the Token Endpoint URL with the OAuth 2.0 token endpoint (v2) value you just copied
-
Ensure that the three below checkboxes are checked:
-
“Send client credentials in header”
-
“Send access token in header”
-
“Include Consumer Secret in SOAP API Responses”
-
-
Click Save.
-
After you create the record, scroll down to the Salesforce Configuration section. Copy the URL listed for Callback URL.
-
Navigate back to Microsoft Azure > Microsoft Entra ID > “Your App Name” > Authentication
-
Click on + Add a platform
-
Select Web
-
Paste the Callback URL you just copied in the Redirect URis field in Azure
-
Click Configure
Create External Credential in Salesforce
-
Go back to your Salesforce screen
-
Go to Setup > Named credentials
-
Navigate to the External Credentials tab
-
Click New
-
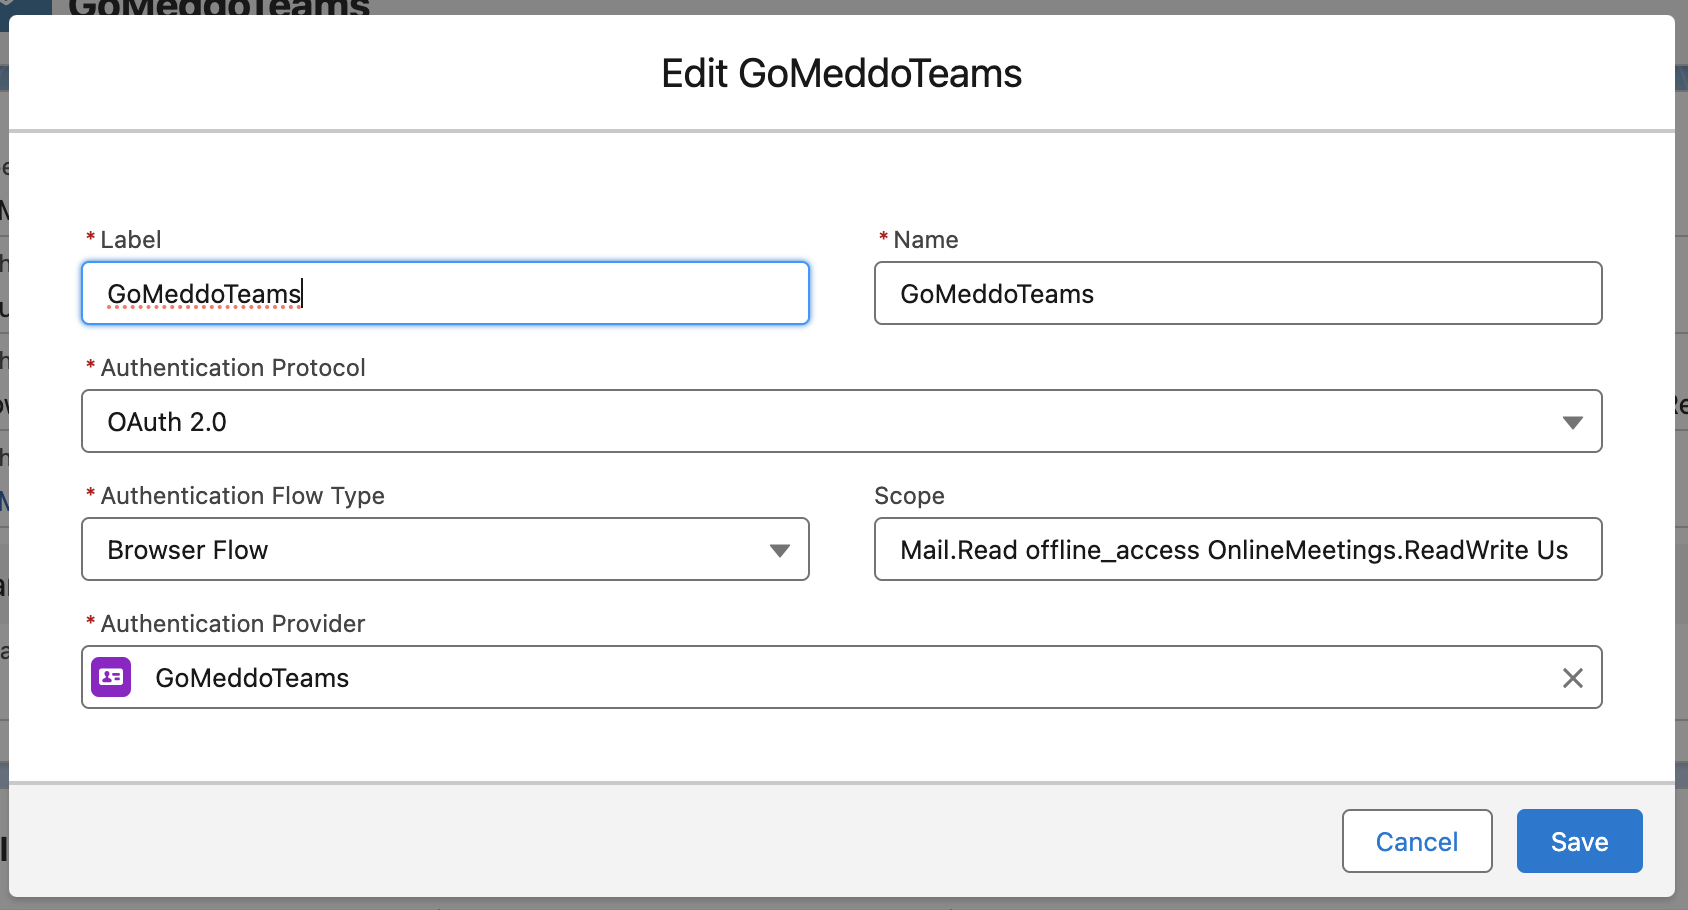
Name it “GoMeddoTeams”, and choose OAuth 2.0 as the protocol
-
Then add scope:
Mail.Read Offline_access OnlineMeetings.ReadWrite User.Read -
Choose the Authentication Provider from the previous step
-
Click Save
-
Scroll down to Principals list
-
Click New
-
Fill in a Parameter Name, this can be anything
-
Leave the Sequence Number as-is
-
Make sure the Identity Type is set to Named Principal
-
Give it the same scope as the external credential:
Mail.Read Offline_access OnlineMeetings.ReadWrite User.Read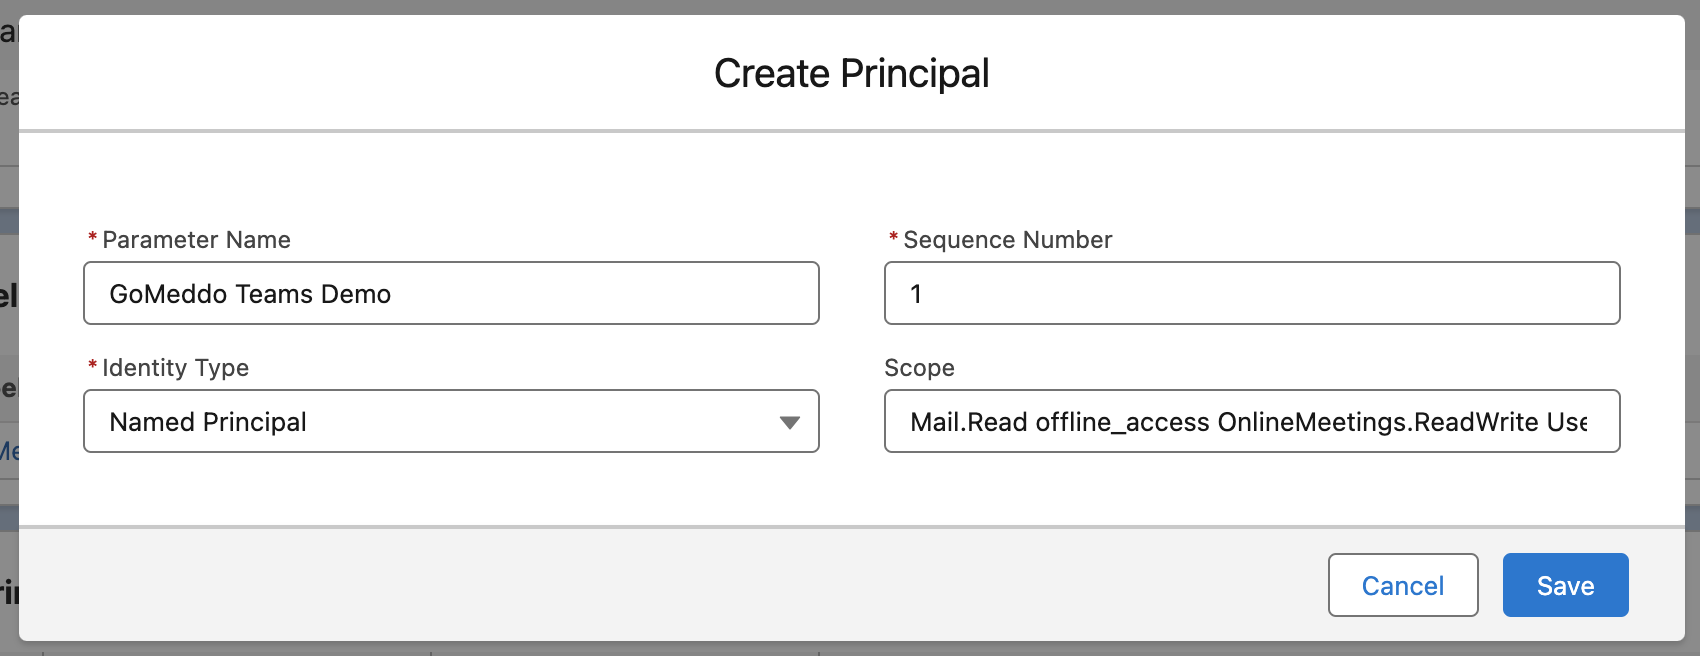
-
Click Save
-
Scroll down to the Principals list again. Click on the down arrow under Actions and press Authenticate:

-
(This step my be skipped automatically) Press Allow. If Azure was properly configured with the Redirect URI, the credentials will successfully authenticate. Note: you may be prompted to log in to Azure again.
-
Afterwards, Salesforce will inform you that it was successful.

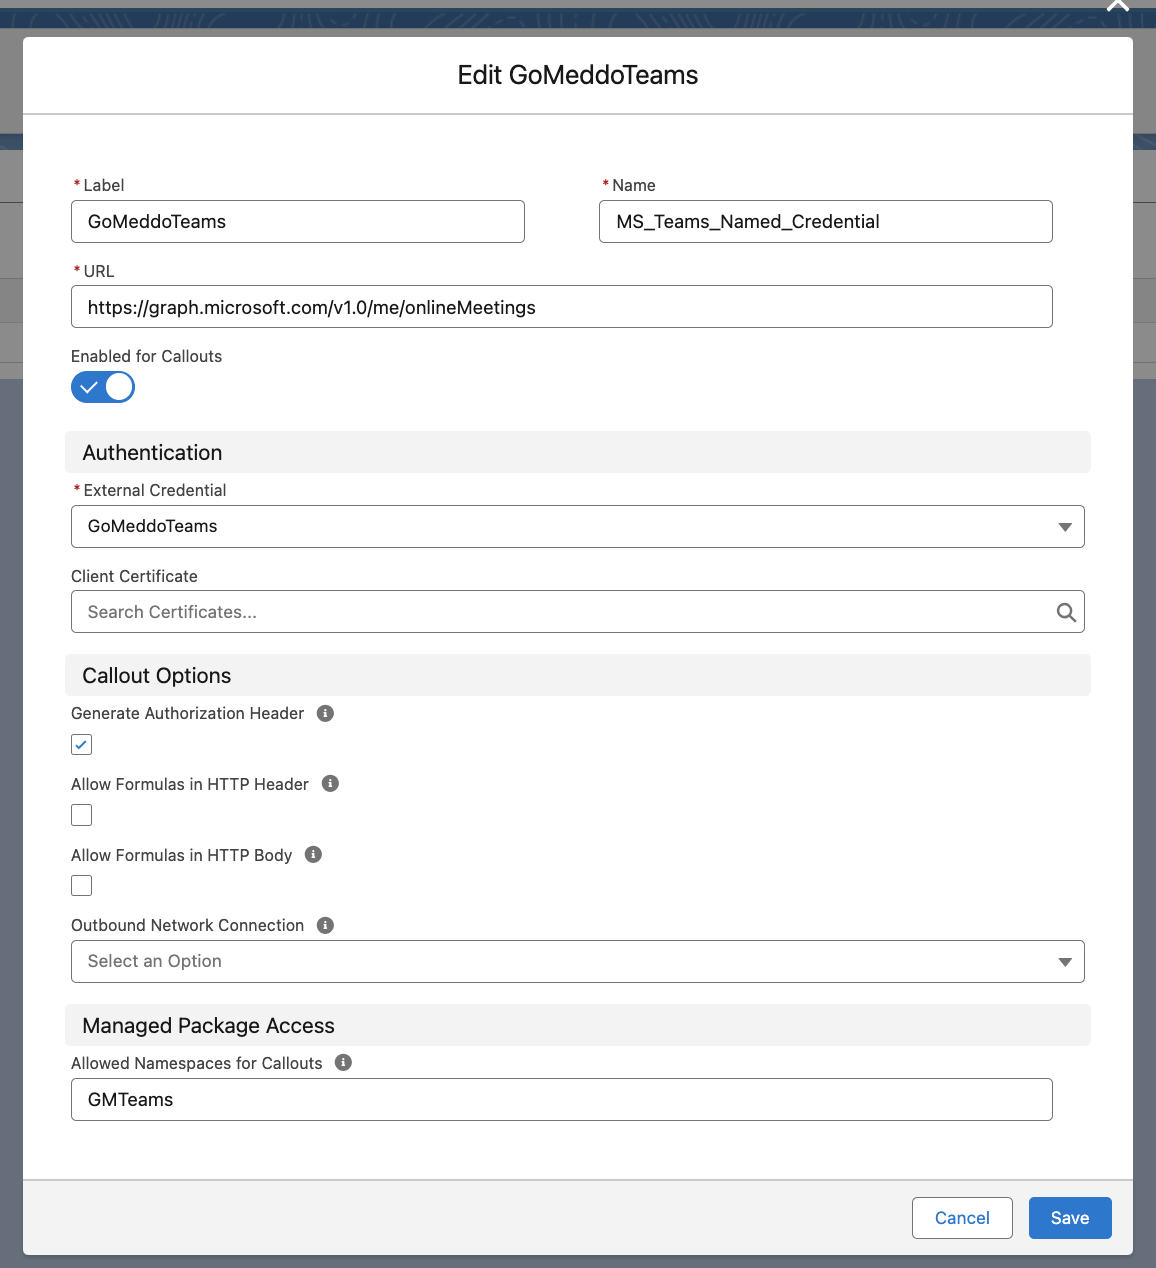
Create Named Credential in Salesforce
-
Go to Setup > Named Credentials
-
Click New under Named Credentials (not External Credentials this time)
-
Add a Label, and add MS_Teams_Named_Credential as the name.
-
Add https://graph.microsoft.com/v1.0/me/onlineMeetings to the URL field
-
Add the External Credentials "GoMeddoTeams" and include "GMTeams" in Allowed Namespaces
-
Leave the rest as-is
-
Click Save
Map Principal to Permission Set in Salesforce
-
Go to Setup > Permission Sets
-
Select an existing Permission Set, or create a new one. This Permission Set will make sure that Reservations created by users contain a Teams link.
-
Within the Permission Set, go to External Credential Principal Access
-
Click Edit
-
Select the Principal from the previous step in the left column, and add it to the right column
-
Click Save
-
Assign this permission set to any user that should generate Teams links for the reservations they create.
Make sure to assign this Permission Set to any user that should generate Teams links for Reservations they create!
Continue
Proceed to Set the meeting url using a flow