GoMeddo allows an out of the box integration with Zoom to facilitate the generation of Meetings from your GoMeddo reservations.
Step 1 install the package:
We assume you already have GoMeddo installed. The Zoom extension is supported in version 5.2 of GoMeddo or higher.
Important! Make sure to always install “For Admins Only”.
Please follow the steps on Set up Zoom App for the next step of this configuration
Step 2 Authenticate the Zoom account:
When you have performed the actions in the Set up Zoom App step, you need to authenticate the Zoom App you just created from Salesforce, it requires you to perform a few easy steps to authenticate.
1. Auth provider
To set up an Auth. provider in Salesforce, follow these steps:
-
Go to Salesforce
-
Go to Setup > Auth. Providers
-
Add a new provider and choose "Open ID Connect" as the type.
-
Go back to Zoom > Basic Information > App Credentials section and copy the Client ID and Client Secret for the next step
-
Give the record a name and enter the Client ID copied from the Zoom app into the Consumer Key field.
-
Add the Client Secret to the Consumer Secret field.
-
Use the following URL for the authenticate URL:
https://zoom.us/oauth/authorize -
Use the following URL for the token URL:
https://zoom.us/oauth/token -
Ensure that "Send client credentials in header" is checked.
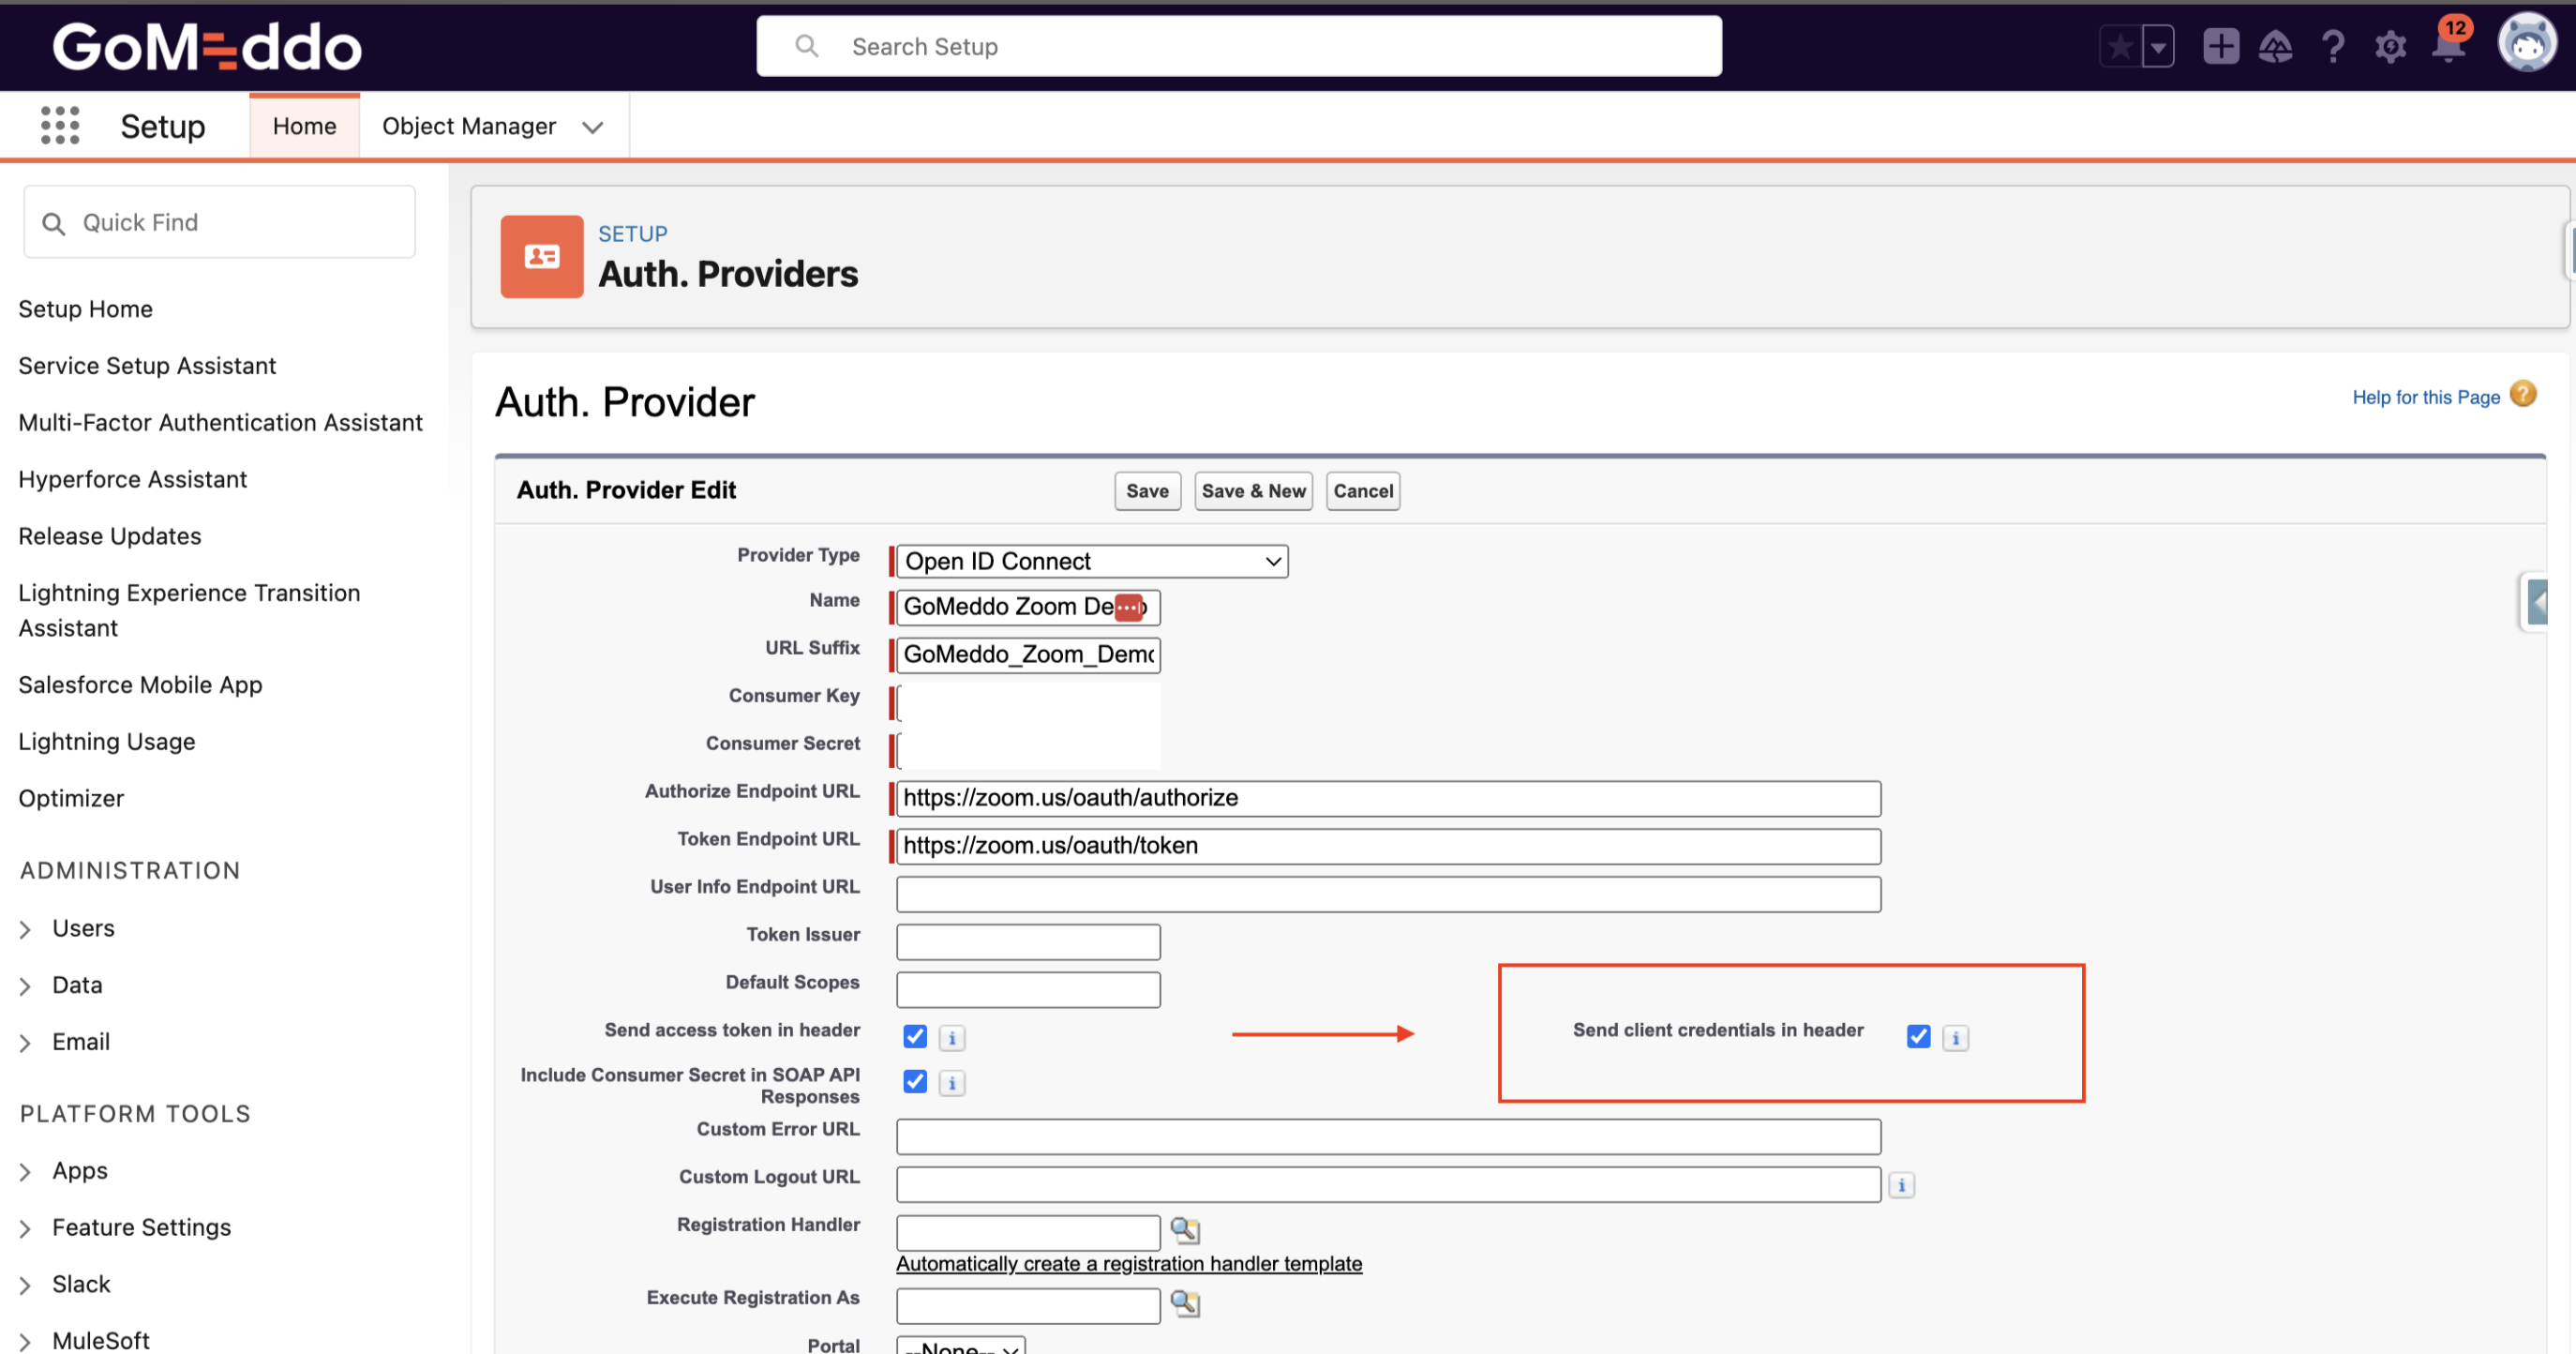
-
Save the record.
-
In the Salesforce Configuration section of the Auth. Provider, copy the value of Callback URL
-
this will be something like
https://your-domain.my.salesforce.com/services/authcallback/YourAuthProviderName
-
-
Go back to Zoom > Basic Information > OAuth Information and add the copied value to the OAuth Redirect URL input; this will also add it to the OAuth Allow Lists automatically.
2. External Credential
-
Go to Setup > Named credentials
-
Navigate to the External Credentials tab
-
Give it a recognisable name and label, and choose OAuth 2.0 as the protocol
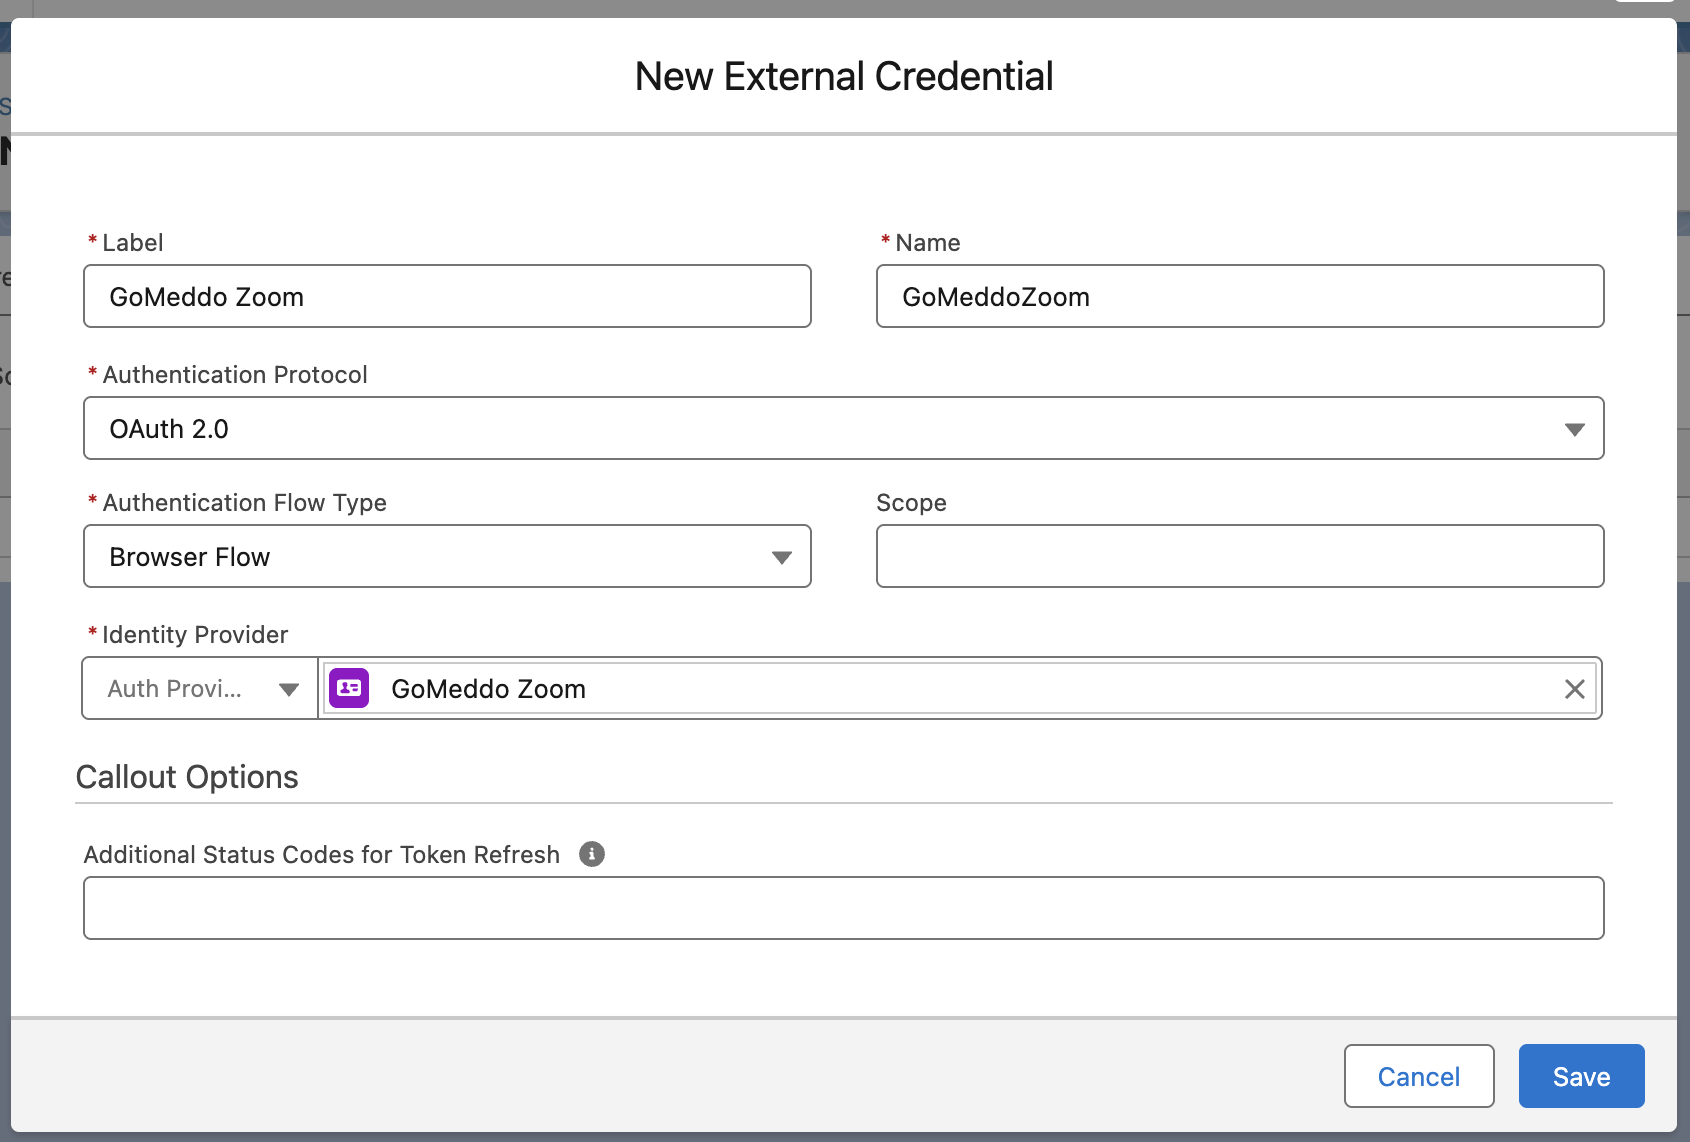
-
Choose the Authentication Provider from the previous step
-
Save
-
Scroll down to Principals list
-
Click New
-
Fill in a Parameter Name
-
Leave the Sequence Number as-is
-
Make sure the Identity Type is set to Named Principal
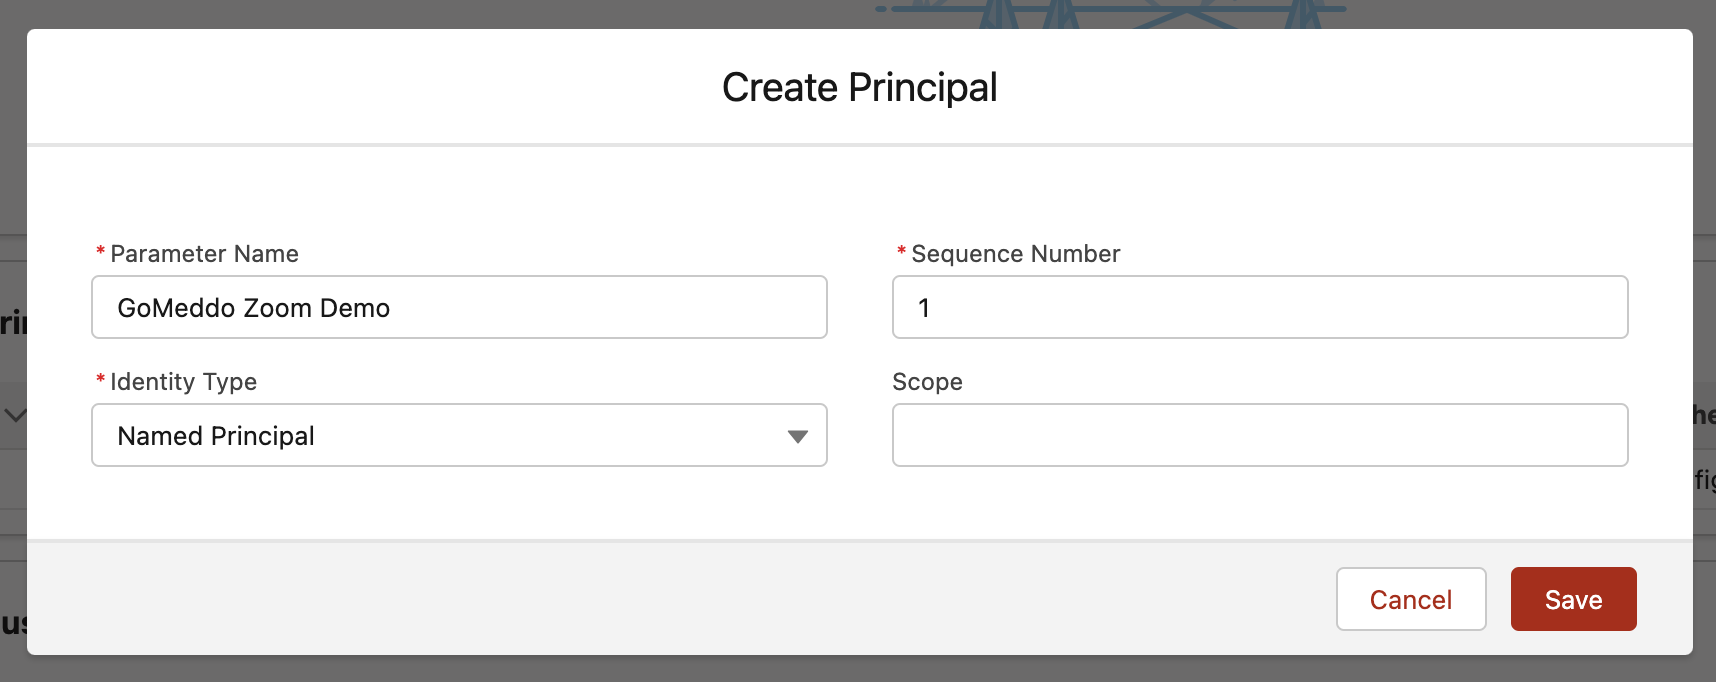
-
Click save
-
Scroll down to the Principals list again. Click on the down arrow under Actions and press Authenticate:

-
Press Allow
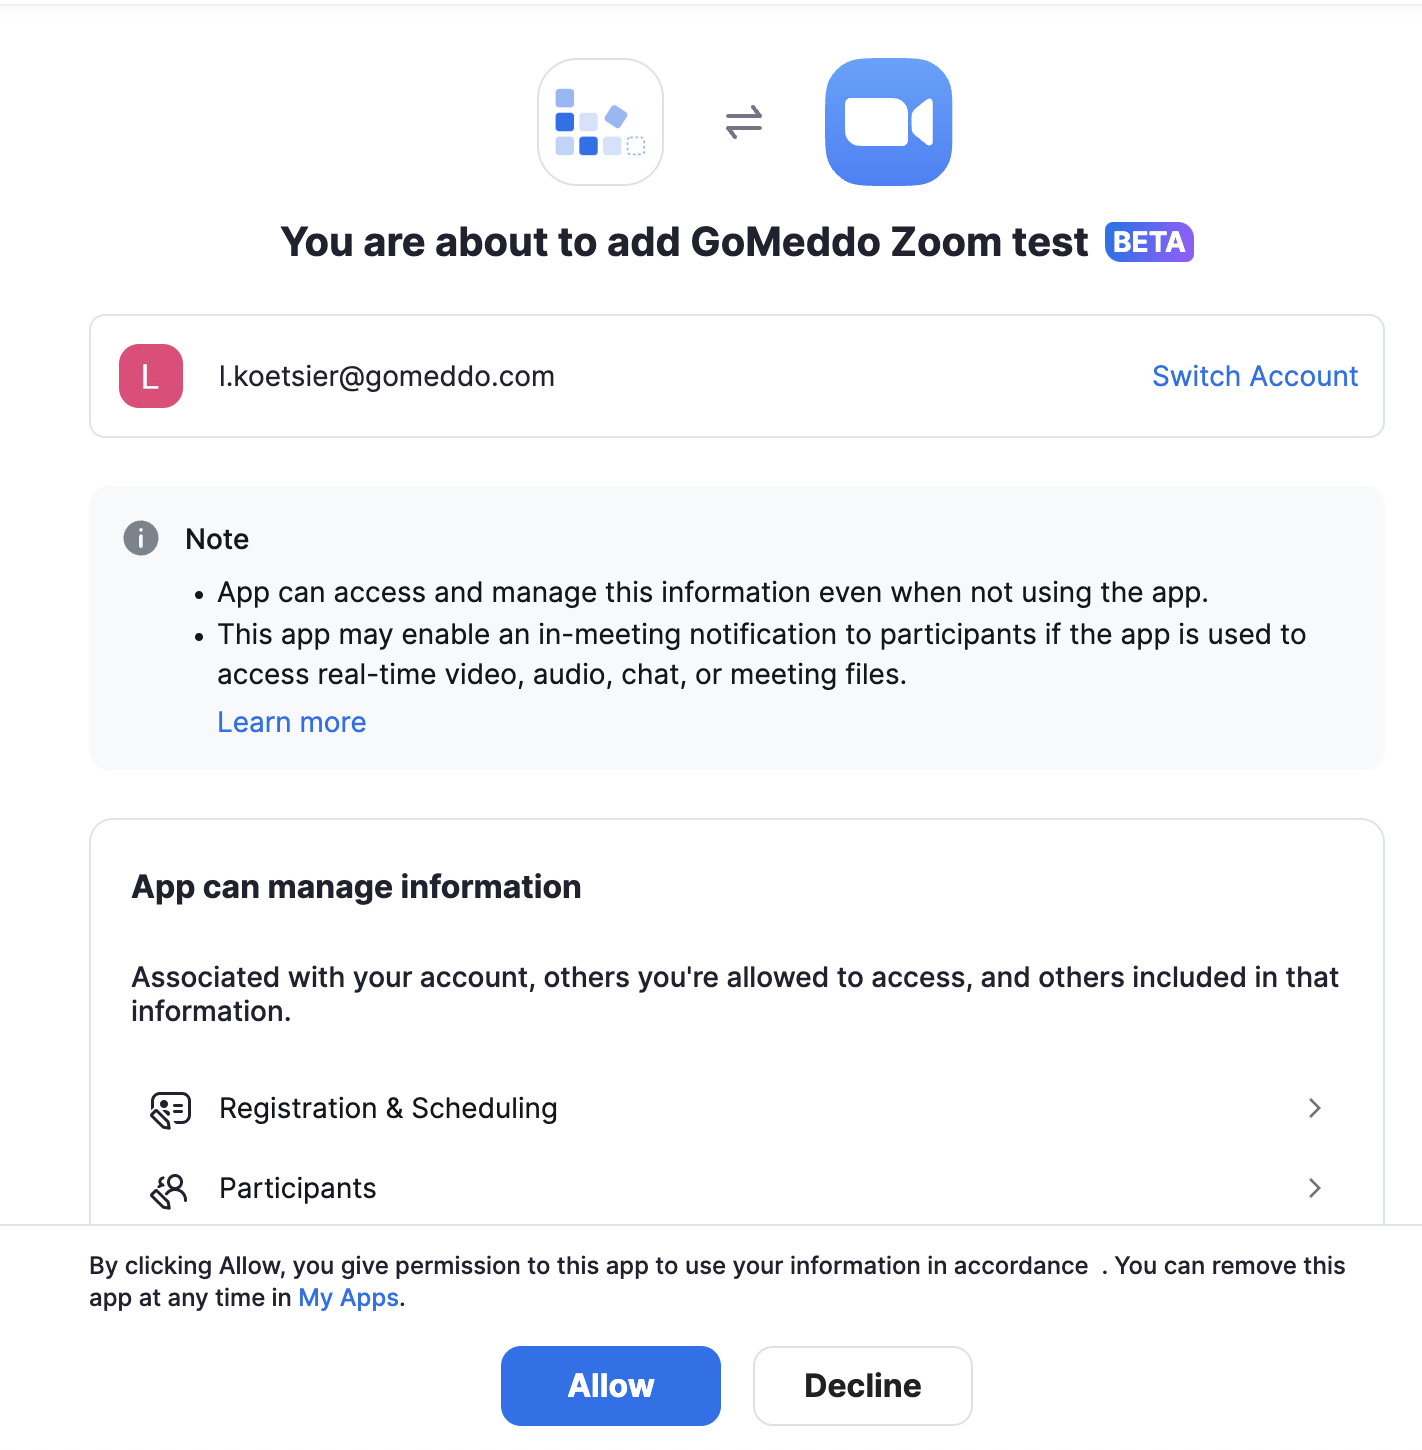
-
Then Salesforce will inform you that it was successful.

3. Named Credential
-
Go to Setup > Named Credentials
-
Click New under Named Credentials (not External Credentials this time)
-
Add a Label and add GoMeddoZoom as name.
-
Add https://api.zoom.us/v2 to the URL field
-
Add the External Credentials "GoMeddo Zoom" and include "GMZoom" as the Allowed Namespaces.
-
Click Save

4. Map Principal to Permission Set
-
Go to Setup > Permission Sets
-
Select an existing Permission Set, or create a new one. This Permission Set will make sure that Reservations created by users contain a Zoom link.
-
Within the Permission Set, go to External Credential Principal Access
-
Click Edit
-
Select the Principal from the previous step in the left column, and add it to the right column
-
Click Save
Make sure to assign this Permission Set to any user that should generate Zoom links for Reservations they create!
Now proceed to section Set the meeting url using a flow
Step 3 Use a flow to create the meeting (example)
This is an example of how to setup a very simple flow which adds a Zoom url to a Reservation once it’s created
-
Go to Setup > Flows and create a new Flow
-
Select Record-Triggered Flow
-
Select Reservation as the object, leave the defaults and at the bottom select “Include a Run Asynchronously path to access an external system after the original transaction for the triggering record is successfully committed”
-
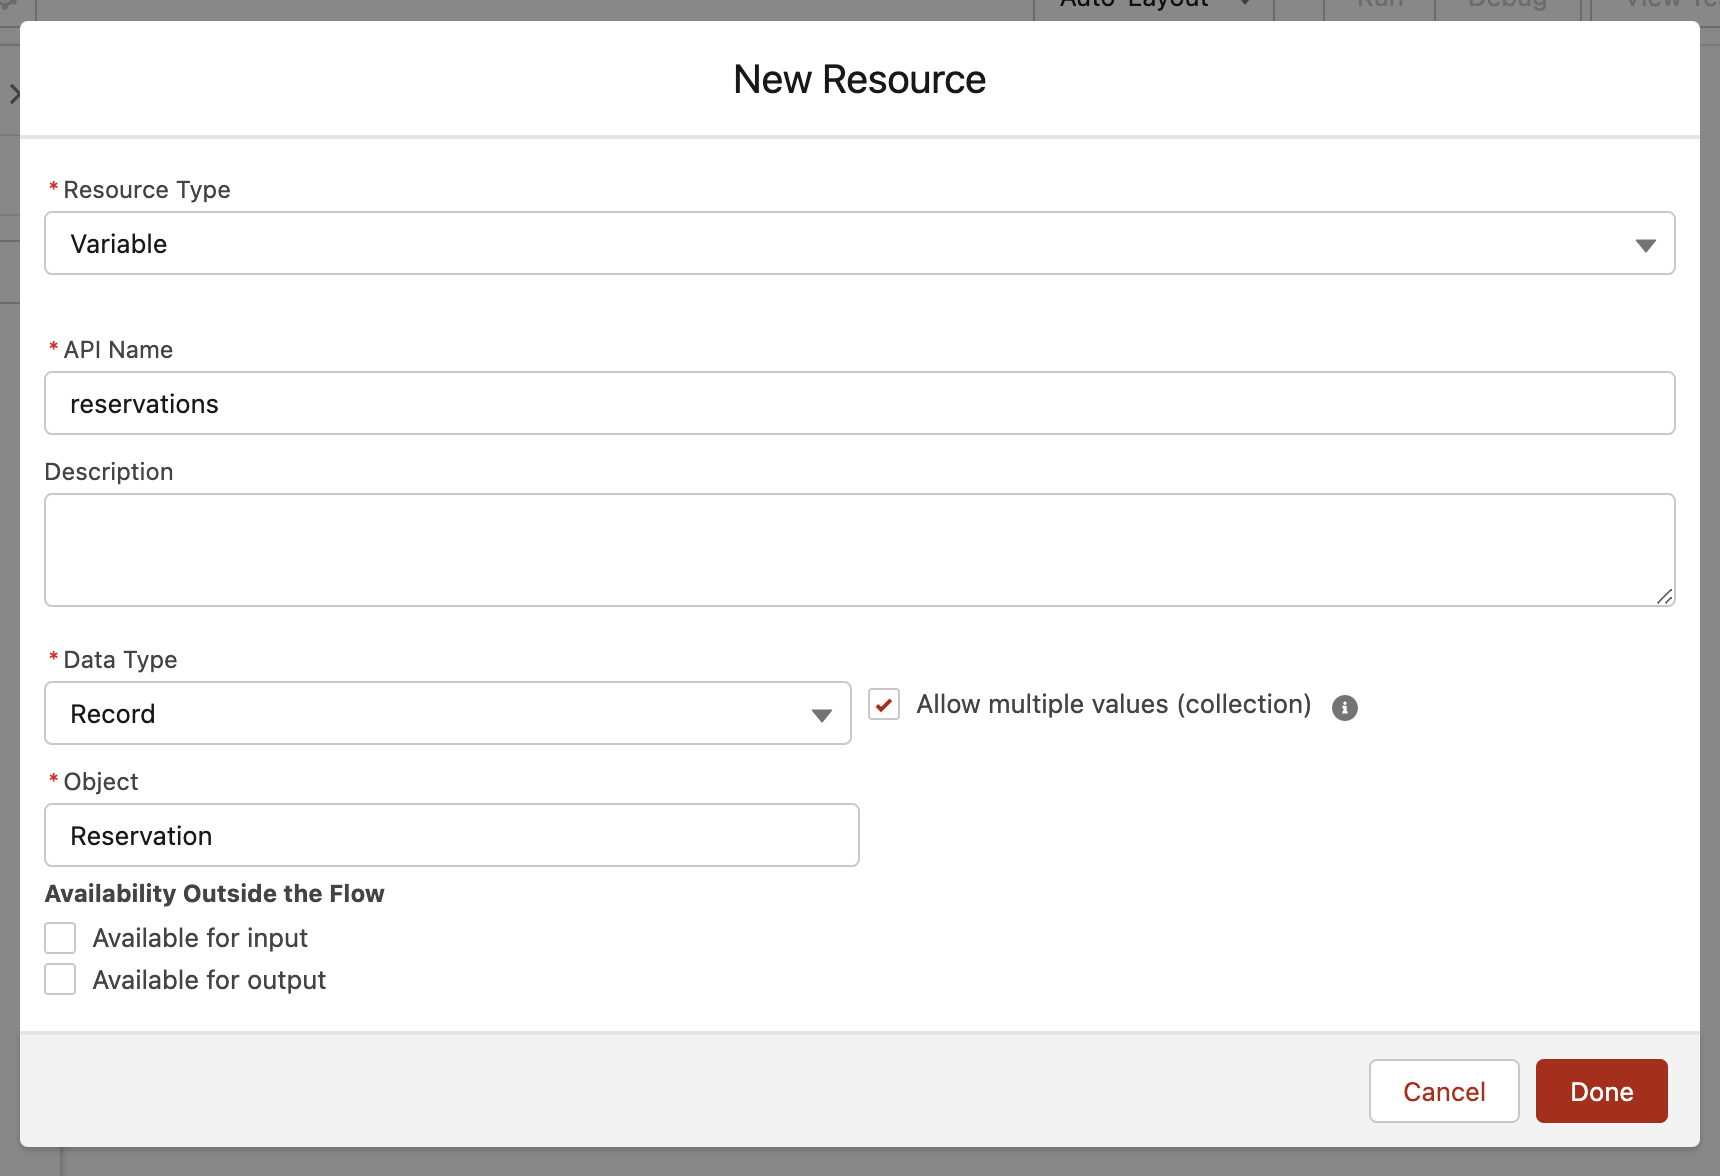
Create a Reservation Collection variable
-
Under Run Asynschronously, click the +
-
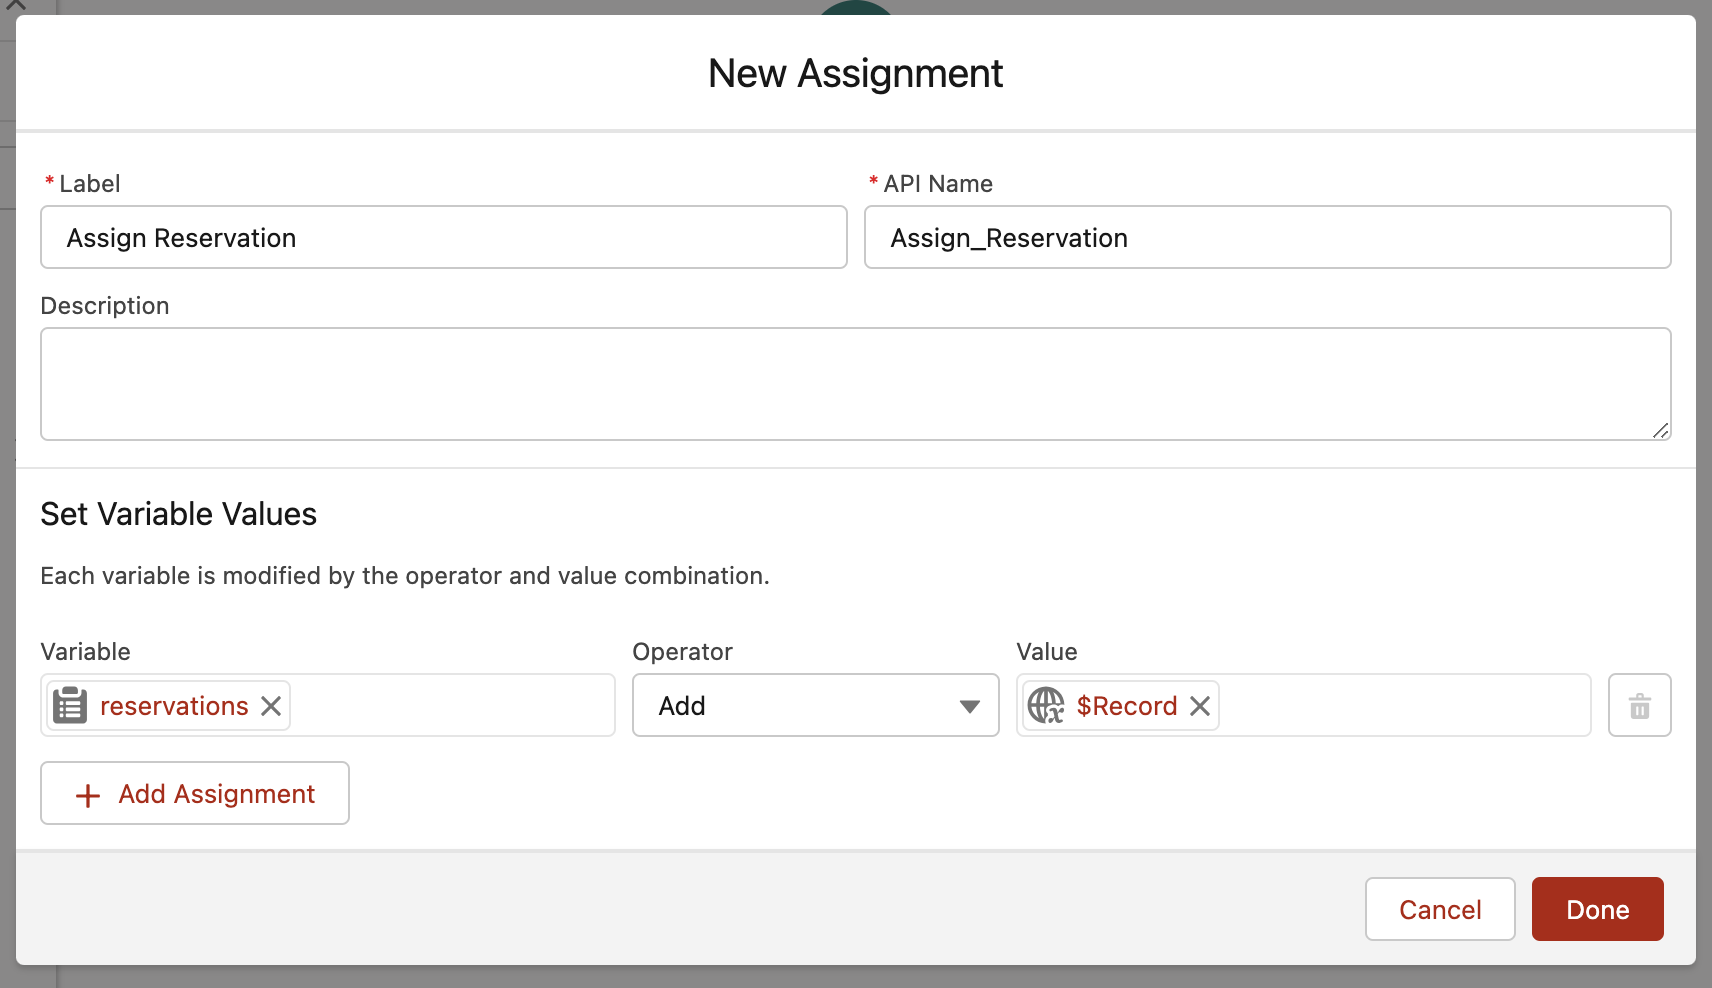
Create an Assignment as follows
-
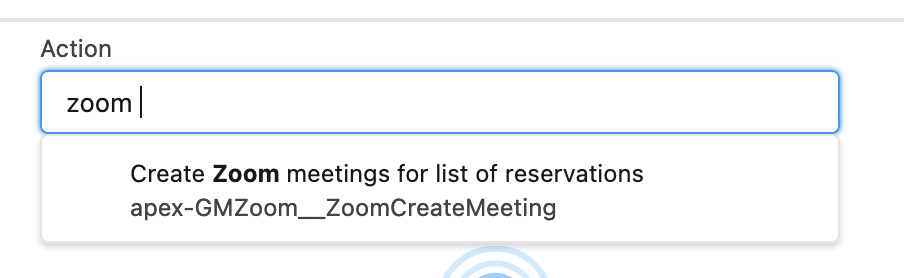
Next, add an Action
-
Select Create Zoom meetings for list of reservations
-
Set the input value reservations to your Reservation Collection
-
Set the input value for "zoomUserId" to the email address of the Zoom user you want to designate as the creator of the meeting, this can be a fixed one or use a field somewhere on the resource, staff etc you’re booking to dynamically do this.
-
Save and activate the flow
-
The flow will now fill the “Zoom_Join_Url__c” field on the Reservation object asynchronously depending on your configuration.
Users who can make reservation should also have the GoMeddo Zoom Permission assigned in order for this flow to run, so make sure to add or assign these permissions to the right users.
Step 4 Add fields to reservation page layout and reservation form
To show the Zoom URL field on the reservation form and the reservation record page, you need to take the following steps:
Steps:
-
Go to Setup - Object Manager and find the Reservation object.
-
Go to Page layouts - there drag the Zoom Join URL field to the page layout and save.
-
Go to Field Sets - Add the Zoom Join URL field to the field set that you are using on your reservation type and save.
As a FYI; The “Zoom Start URL” field also exists, this is added for possible future extensions of the Zoom App. For now you can just use the “Zoom Join URL”